Written by By Teresa Cotner, PhD
Dr. Janet Turner (1914-1988) was a professor of fine art and art education at California State University, Chico (1959-1981), teaching generations of artists and teachers. She collected prints beginning in the 1940s so that she could show her students new techniques and new ideas through examples of original art. Her collection has been housed (and continues to grow) at Chico State since 1981 and finally arrived in its permanent home in the new ARTS building in 2016. In keeping with the museum’s mission of making the collection accessible in the North State and beyond, the Turner Board of Directors with support from the College of Humanities and Fine Arts launched a free after school art program for kids at the Turner, Kids@Turner. As a member of the board, and as an art educator, I was more than happy to develop and coordinate this program in which college student interns interested in teaching art, get hands-on experience co-creating lessons and co-teaching kids ages 5-13 at the Turner Museum.
When I let the parents of the kids who attend our classes know that we would not be able to conduct our classes scheduled for March, April and May 2020, many of the parents shared their great support of the program as well as high hopes for the program to return in fall. They also shared some of the artwork their kids had been making at home. This enthusiasm inspired me to ask my college student-teacher interns to complete their internship by creating art lessons using materials that kids might already have at home, Kids@Turner@Home art lessons.
Here are two of the lessons written by interns, Embossed Foil and Kindness Rock Project. You can also find these and more art lessons on the Turner web site under Education & Outreach https://www.csuchico.edu/turner/index.shtml. You can most likely find materials for these projects around the house (or yard). Kids of any age and adults will enjoy these creative art projects. Make as many as you want! Art is an excellent way for us all to get through these times of schools and businesses closed, shelter in place, and quarantine. Enjoy, and please send pictures of your work to add to the Turner web site: tlcotner@csuchico.edu.
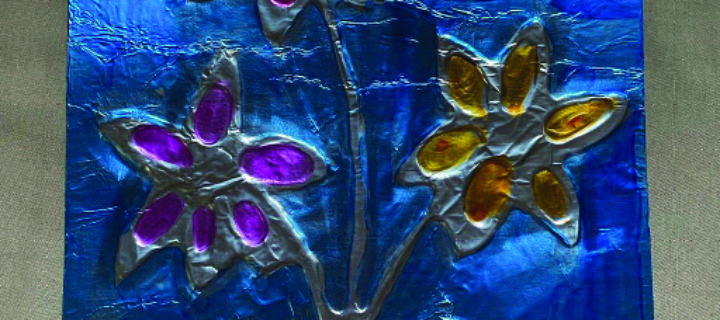
Embossing Tin Foil Art
By Intern: Bianka De La Rosa
Kids will: draw an image on a cutout cardboard piece (ex. a cereal box) where they’ll then trace the lines over with white glue. They will let it dry for a day before placing a sheet of aluminum foil on top to rub around the edges. Finally, they can color in the spaces with permanent markers!
Materials:
A piece of cardboard (any size you’d like)
Pencil
White Elmer’s School Glue
Aluminum foil
Glue stick
Colored permanent markers (optional)
Step by Step:
DAY 1:
Make a drawing on the cardboard piece that is already cut (parent advised) with a pencil.
Trace all the lines with white glue (with the help of a parent might be needed) and let it dry for at least 24 hours in a safe place! Waiting is the hardest part! But rest assured, it’s worth the wait.
DAY 2:
After the glue has dried, rub the entire drawing with a glue stick. Cover ALL of the cardboard. Any missed spots will not stick to the foil.
Tear a sheet of aluminum foil that is a bit larger than the cardboard. Place the foil over the top and begin to press it down around the sides and glue in place.
Rub carefully around edges of the glue with the end of a pencil eraser, so you don’t rip the foil! The better the rubbing, the more defined the drawing.
Once you get the foil how you like it, you can begin to color in all the flat places with permanent Sharpie markers. Coloring it in is the fun part! But if you don’t have access to markers, it looks just as amazing (Do not color in the raised foil lines, however!).
The Kindness Rock Project
By intern: Cierra Prestegard
Materials:
Rocks of all sizes (preferably ones the size of your palm)
Pencil and paper for sketching
Sharpie for smaller details
Acrylic paint or other paints in several colors
Paintbrushes
Glitter
Glue
Googly eyes (optional)
Newspaper for a surface to work on
Cup with some water to rinse brushes off
Paper towel/napkins
Paper plate for paint
Creative mind
Step by Step:
This will be entirely up to how the student wishes to work:
Find rocks around your yard or neighborhood that are about the size of the palm of your hand-or bigger if you’re feeling adventurous. Next, gather your paints and other materials that you would like to use to decorate your rocks.
Next, look up pictures, words, etc., that you would like to paint on the rocks or come up with some cool and creative stuff of your own. You can also use the pencil and paper to sketch something beforehand.
Once you have your ideas ready, start painting your rocks. Let your imaginations take over and paint as many rocks as you wish! If you want to start with a base coat on a rock, let it dry before you add any smaller details or anything on top. You can work on another rock in the meantime.
Once you finish painting your rocks, let them dry completely.
Now that all your rocks are dry, with help from a parent or older sibling, you can start placing them around your neighborhood for people to find while they are taking walks. What a great way to brighten someone’s day and make people happy!